Back to TheWorxHub for Senior Living Main Menu
Editing an Instance of a Scheduled Work Order
While Scheduled Work Orders allow you to setup a recurring pattern for a particular type of work, it is common to require a change to just one instance of a particular schedule. An "instance" is an individual work order that has been generated by the schedule. There are a few steps you must take to be sure you are editing only one instance, and not the entire schedule.
How to Edit an Instance of a Scheduled Work Order
- Click on the Calendar tab.
- Navigate to the date of the scheduled work order instance you would like to edit.
- Use the calendar filters to populate the calendar with the appropriate scheduled work order.
Identifying a Scheduled Work Order Series vs. a Scheduled Work Order Instance
- It is important to identify whether the work order instance has generated for the date you need to edit. If it hasn't, you will be making the edit to the whole schedule, rather than just one date.
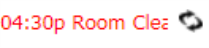
- Before the instance for this date is generated, the scheduled work order title will appear on the calendar date with a recurring symbol (
 ). If that symbol does not appear, the work order instance has already generated and can be edited as is.
|
Scheduled Work Order Series: Work order has NOT been generated |
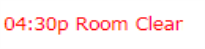
Scheduled Work Order Instance: Work order has been generated |
|
|
- If the scheduled work order title does show a recurring symbol (
 ) next to it, you must first generate the instance before editing.
Generating a Scheduled Work Order Instance
- Double click on the Scheduled Work Order title.
- In the recurrence box to the right of the pop up window, note the Generates next on date. When you generate the work order, it will generate for that date. *Note: You must generate each instance leading up to the date you need to edit.
- Click Generate Now. *Note: Once a work order has been generated, this action cannot be undone. The work order can, however, be edited at any time.
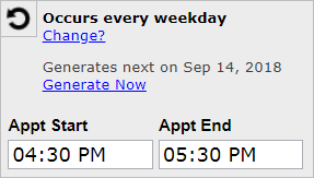
- In the pop up window, click Yes to confirm that you would like to generate the work order.
- Repeat this process until you have generated the date you need to edit.
- Click the x in the top right of the Scheduled Work Order Series window to navigate back to the calendar.
Editing a Scheduled Work Order Instance
- Find the Scheduled Work Order on the date you need to edit. The title should no longer have a recurring symbol (
 ) next to it, indicating that the work order has generated for that date.
 - Double click on the scheduled work order title to open the Work Order window.
- Make any edits needed for this particular work order, then click Save.
